

Using Rollback 10.7 (Part II)
In this issue, we will continue with the rest of the topic for the Rollback 10.7
Common tasks
Restore the system to its original state
This is similar to the Windows Recovery task mentioned in the previous article, but the other is to delete all restore points and restore points.
baseline
This means that after performing this task, the machine returns to the state when installing Rollback
In the menu
Tools and Settings
Choose BaseLine Manager
Or simply press Ctrl + L
Then choose Reset to the BaseLine
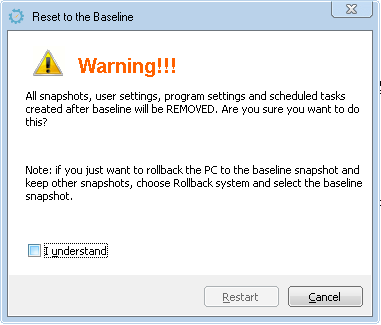
An alert indicates that the restore points after the base restore point will be deleted. You must check the "I understand" checkbox before doing this task
Recover the file
This task is useful when one or more files are lost (when the system is restored due to a failure to start Windows or to delete the wrong one) but can not or does not want to restore the system (to affect the other) .
In the menu
Common Tasks
select Recover Files
Or simply press Ctrl + F
Select restore point contains missing files. Then find them as in Windows Explorer ...
Restore when failed to start Windows
As we all know, after the power button is pressed, the BIOS first checks the status of the device, the input ports ...
If everything is OK, the boot process starts with reading the Windows boot sector information in the first sector of drive C, but if you have Rollback installed, this sector will be rolled up by Rollback and boot it up for some time. seconds before transferring to the Windows boot information.
Depending on the machine configuration and settings in the BIOS, we need to estimate the time after pressing the Power button to click or press the Home button to keep the rollback from moving to Windows startup.
Press the Tab key to enter the Rollback menu, the default focus is at:
Restore
Press enter, the list of restore points will appear, the cursor is in the first item by default:
Installation
That is the restore point of the machine before the status of Rollback
You can press the down arrow to select the desired restore point and press enter to start the recovery process and wait for Windows to start.
In short, for some reason not to damage the hardware but not to windows, just restart the machine press the home key to hold back the tab and press Tab and press enter twice normal Windows.
After starting Windows, Rollback will come up with a message stating that some of the files may have been lost and that we can retrieve it using the Recovery feature with the newly created restore point.
We can check to make Rollback does not appear this message anymore.
Note that if password protection is created, it must be entered before accessing Rollback to perform the above operation.
Uninstall
Important note: When you want to restore ghost images, definitely, you must uninstall Rollback first !, if you do not want to reformat the hard drive and recreate the MBR ... from the beginning!
It can be uninstalled by running Setup again or in Program Manager, navigate to Rollback and select
Uninstall
The uninstall interface appears, confirming by pressing the "Yes" button.
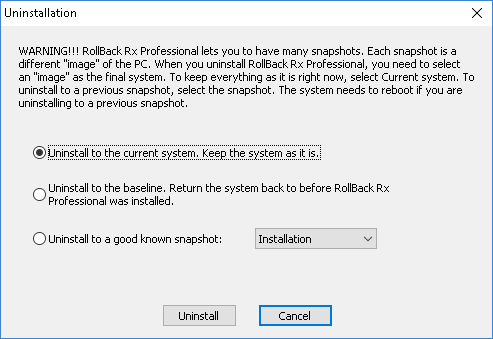
Choose from the following options:
1.Uninstall to the current system. Keep the system as it is.
Uninstall and keep Windows as it is
2.Uninstall to the baseline. Return the system back to before RollBack Rx Professional was installed.
Uninstall and put Windows back to baseline restore status (status as if Rollback was updated or before Rollback was installed).
3.Uninstall to a known snapshot: Installation
Uninstalling and reinstalling Windows on a known restore point status is fine (which you must select in the next list).
• Follow the button
Uninstall
to proceed with the uninstall. When the removal is complete, If the machine has multiple operating systems then move to the next operating system and continue uninstalling.
Finally, it is possible to delete the installation directory, usually the Shield in the Program File
Share via:
EmailFacebookTwitterGoogleLinkedin